


I've had a serious and weird obsession with birch plywood recently. Seriously, I have to commend the patience of the hardware store staff for standing by patiently while I examine the plywood panels searching for the perfect one. I've covered walls with plywood panels, made side tables, hacked my IKEA dressers with it and now, a plywood clock. Actually, this project is a guest post by my son, Konrad. This clock is a project he did for a competition this month, but he gave me permission to share the tutorial with you. It's now hanging proudly on the wall of my design studio.

--1/4 inch thick plywood cut into 10 - 12 inch circle
--drill gun with 1/4 inch bit
--painter's tape
--clock kit (this one is from Hobby Lobby)
--clock sweep handles (used these long ones and spray painted them gold)
--wood die-cut numbers (Konrad used these die-cuts from Hobby Lobby)
--wood stain (Konrad used Minwax in Early American shade)
--Minwax Paste Finishing wax
--Modge Podge
--q-tips
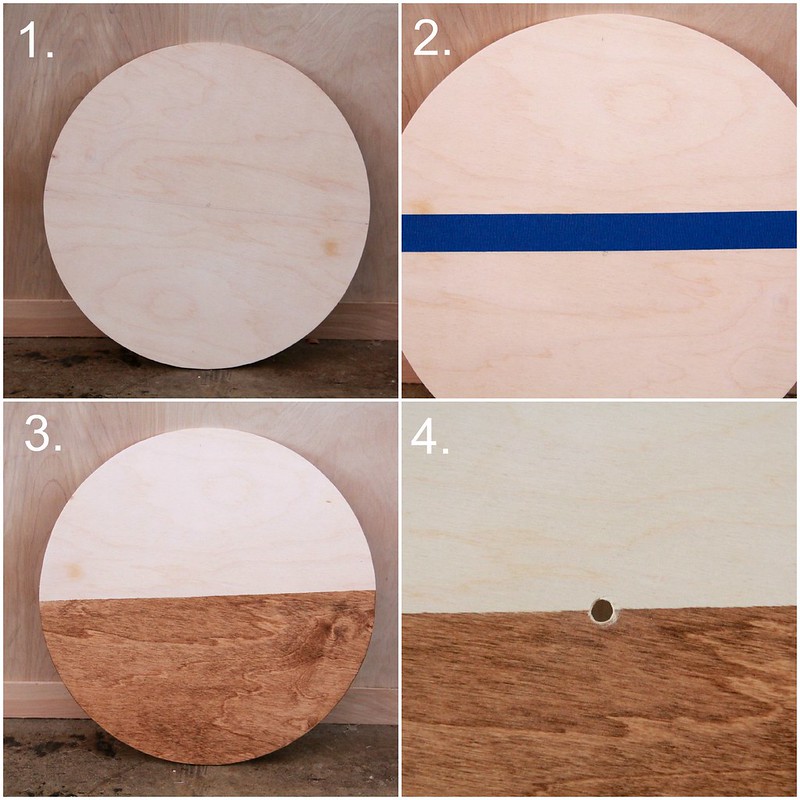
1. Cut the plywood in a circle or have a hardware store do it for you. You can also buy round plywood sections at most hardware and craft stores. Lightly sand the edges.
2. Using painter's tape, mark the clock in half.
3. Stain one half once or twice depending on how deep you want the color making sure to get the edge as well. Konrad stained twice. Remove tape and let set.
4. Drill a hole in the center of plywood to allow for clock mechanism.
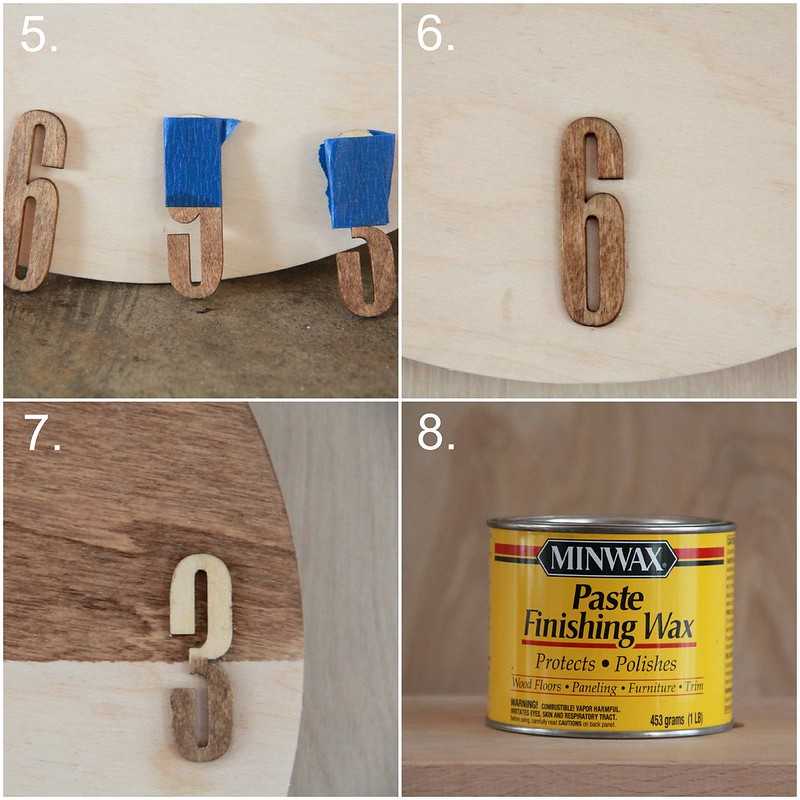
6. With a q-tip, apply Modge Podge to back of numbers and attach to clock face.
7. Let dry for a couple hours.
8. With a soft cloth, apply the wax to clock face and wood numbers. Use a q-tip to clean away the wax from around the numbers.
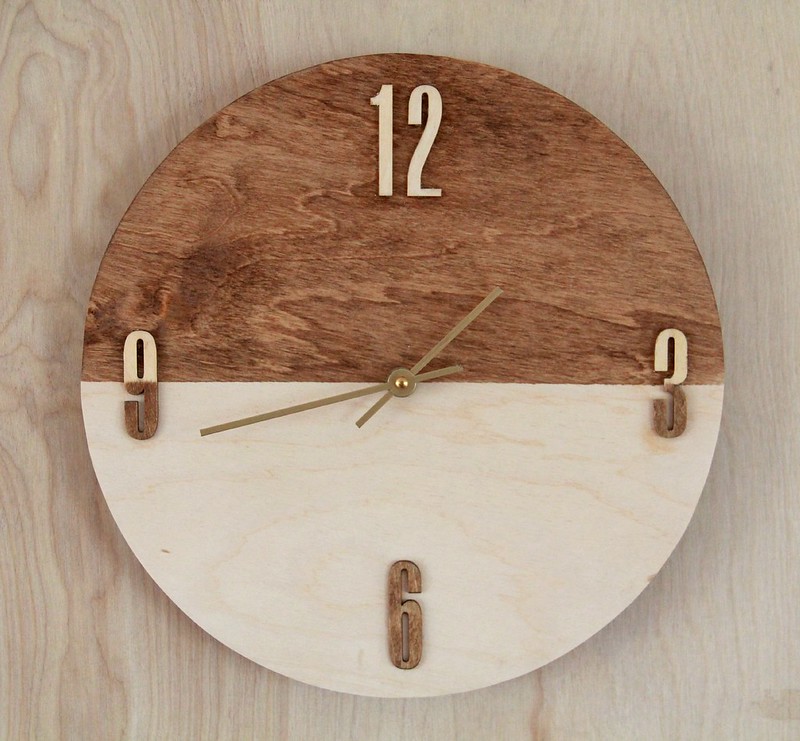
9. Follow clock kit directions to attach kit to clock.
9. DONE.


What! This is too beautiful- amazing!
ReplyDeleteThank you!
DeleteGaaaahhhhh...I love this! What a great project that you can proudly display in your home.
ReplyDeletejust so so..
ReplyDeletenot unique
I love this stained plywood wall clock ,especially its unusual appearance,Thank you for sharing this tutorial!DIY home decor making tutorial.
ReplyDeleteWow, so creative diy project.
ReplyDeleteVery elegant!
ReplyDeleteIncorporating unique wall clocks into your home décor is an excellent way to add both functionality and style. These clocks serve as eye-catching statement pieces that can instantly elevate the look of any room. Whether you're going for a modern, vintage, or quirky theme, unique wall clocks come in a variety of designs to suit your personal taste. They not only help keep you on schedule but also act as decorative focal points that tie the room together. A well-chosen wall clock can transform a plain wall into a creative, conversation-starting feature in your home.
ReplyDeletehis DIY stained plywood wall clock is such a creative and elegant project! It’s amazing how you can transform a simple plywood circle into a stylish and functional clock. The stained finish gives it a beautiful depth, and the contrasting numbers add a unique touch. I love how clocks
ReplyDeletelike these can serve both as practical timepieces and as bold design elements in any room. This project is a great reminder that with a little creativity, even the most basic materials can turn into something extraordinary for home decor.
I love how this DIY plywood clock turned out.
ReplyDelete
ReplyDeleteThis is very good and useful information.
ReplyDeleteI appreciate your information in this article.
ReplyDeletethank you for giving such useful information that is often difficult to come by. Good job.
ReplyDeleteVery good article, I enjoyed reading your post
ReplyDeletethanks for sharing this beautiful blog
ReplyDeletetruly appreciate this post. I’ve been looking everywhere for this!
ReplyDeleteIt’s very nice. Congratulations.
Really enjoyed this post! A wall clock can add so much character to a room while still being practical. I love how the right design becomes a stylish focal point on the wall. I recently explored Vibecrafts’ collection, and their wall clocks are beautifully crafted - perfect for giving modern interiors a clean and elegant touch!
ReplyDeleteAt Vibecrafts, we design stylish Wall Clock collections that blend elegance, precision, and modern décor. Our premium timepieces enhance every space with charm and functionality, making your walls stand out while keeping perfect time with lasting quality.
ReplyDelete